For the longest time, Binance Web3 Wallet was something I only used on my phone.
The mobile experience was fine. It worked. But anyone who has tried to seriously navigate DeFi protocols, review transaction details carefully, or manage multiple positions simultaneously on a phone screen knows the frustration. Small buttons, tiny text, constant zooming in and out. It gets old fast.
So when Binance quietly launched the desktop web version of their Web3 Wallet, I was genuinely interested. I spent a week using it as my primary Web3 interface for everything from simple token swaps to exploring new DeFi protocols. I ran into problems, figured things out, and formed some clear opinions.
This is everything I learned — written the way I wish someone had explained it to me before I started.
What Binance Web3 Wallet Actually Is
Before getting into the how-to, it is worth making sure we are talking about the same thing — because Binance has several wallet-related products and they are easy to confuse.
The Binance Web3 Wallet is not your main Binance exchange account. That is your centralized exchange wallet where you buy, sell, and hold crypto on Binance’s platform. Binance holds the keys to that wallet. You trust Binance.
The Web3 Wallet is different. It is a self-custody wallet — meaning you hold the private keys and Binance cannot access your funds. It connects to decentralized applications, DeFi protocols, and blockchain networks the same way MetaMask or Trust Wallet does.
The key distinction Binance made with this wallet is the key management. Instead of giving you a traditional 12-word seed phrase to write down and protect, Binance Web3 Wallet uses a Multi-Party Computation (MPC) system. Your private key is split into three parts — one stored on your device, one on Binance’s servers, and one backed up to your personal cloud storage. No single party has your complete key.
This makes setup simpler and recovery easier. But it also means understanding this architecture matters before you use it.
The desktop version brings this entire system to your browser at binance.com — no separate app download required.
Setting It Up on Desktop — Step by Step
Step 1: Log into your Binance account
Go to binance.com and log in with your regular Binance credentials. If you do not have a Binance account, you will need to create one and complete KYC verification before accessing the Web3 Wallet.
This is one important difference from MetaMask — Binance Web3 Wallet requires a Binance account. If anonymity is important to you, this is a meaningful consideration.
Step 2: Find the Web3 Wallet
Once logged in, look at the top navigation bar. You will see options for Markets, Trade, and other sections. Find the Wallet section and click it. Inside the wallet area, you will see tabs for your main Fiat and Spot wallet, your Funding wallet, and your Web3 Wallet.
Click on Web3 Wallet. If this is your first time, you will be prompted to create it.
Step 3: Create your Web3 Wallet
The creation process walks you through setting up the MPC key system. You will be asked to set a wallet password — this is separate from your Binance account password. Choose something strong that you will remember.
You will also be prompted to set up your cloud backup for the third key shard. This is important and should not be skipped. If you lose access to your device and your Binance account simultaneously, this backup is what allows recovery.
The entire creation process takes about five minutes.
Step 4: Note your recovery options
Before you do anything else, understand your recovery setup. The Web3 Wallet does not give you a traditional seed phrase. Instead, it uses the three-key MPC system I described earlier. Make sure your cloud backup is configured properly — this is your safety net.
If you ever want to export to a traditional seed phrase format, Binance does offer that option within the wallet settings. I recommend exploring this after setup so you understand your full range of options.
The Desktop Interface — What It Actually Looks Like
The desktop Web3 Wallet interface is significantly more usable than the mobile version for complex tasks. Here is what you get.
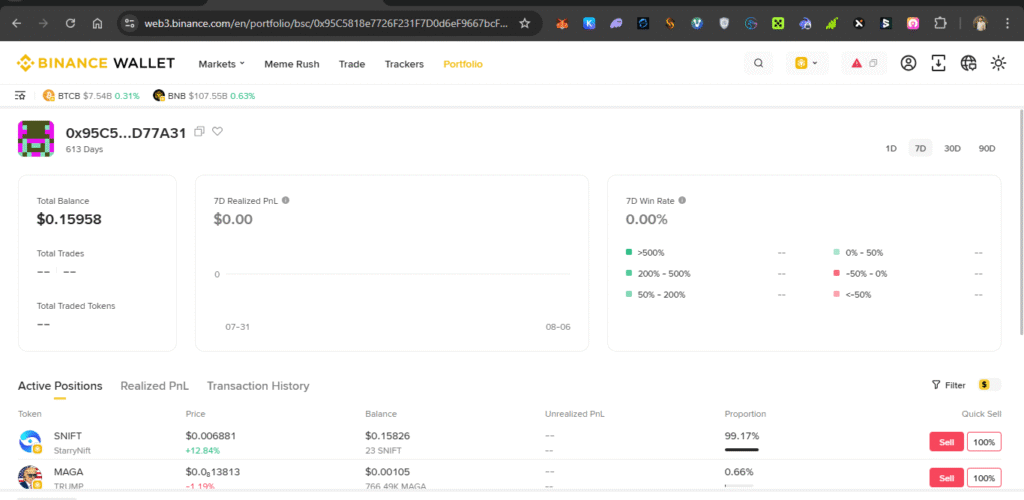
Portfolio view — A clear overview of all your assets across multiple networks. The desktop version shows this information in a way that is actually readable without squinting. You can see token values, percentage changes, and network distribution at a glance.
Multi-chain support — Binance Web3 Wallet supports a large number of networks including BNB Chain, Ethereum, Polygon, Arbitrum, Optimism, Base, Avalanche, and others. On desktop, switching between networks is smooth and the interface clearly shows which network you are currently using — something that trips up a lot of users on mobile.
Built-in swap — The wallet has a native swap function that aggregates liquidity from multiple DEXes to find the best rate. On desktop, you can clearly see the route your swap will take, the price impact, the fee breakdown, and the estimated output before confirming. This transparency is genuinely better than most standalone DEX interfaces I have used.
DApp browser — This is where the desktop version really shines. On mobile, using DeFi applications through an in-app browser feels cramped and awkward. On desktop, you can open DeFi protocols in your normal browser window and connect your Binance Web3 Wallet to them directly — similar to how you would connect MetaMask.
Transaction history — Full history of all your Web3 Wallet transactions, organized clearly by date. Finding a specific transaction on desktop takes seconds. On mobile it can take minutes of scrolling.
How to Connect to DApps on Desktop
This is the part that confuses most people coming from mobile-only usage. On your phone, the in-app browser handles DApp connections automatically. On desktop, it works differently.
When you visit a DeFi protocol or any Web3 application on your desktop browser, it will show a “Connect Wallet” button. Click it. You will see a list of wallet options — MetaMask, WalletConnect, Coinbase Wallet, and others.
Binance Web3 Wallet on desktop uses WalletConnect for DApp connections. Here is exactly how:
Step 1: Click Connect Wallet on the DApp you want to use
Step 2: Select WalletConnect from the options
Step 3: A QR code will appear on your screen
Step 4: In your Binance app on your phone, open the Web3 Wallet section and look for the scan/QR code option
Step 5: Scan the QR code with your phone
Step 6: Approve the connection on your phone
Your desktop browser will now show your wallet as connected. You can now interact with the DApp on your desktop while approvals happen on your phone.
Yes — this means you need your phone nearby when using DApps on desktop. Some people find this annoying. Personally I find it less annoying than I expected because the actual DApp navigation on desktop is so much better than mobile that the phone approval step feels like a minor inconvenience.
You still own your keys. Binance does not store or control them. This makes it a true self custodial experience.
Sending and Receiving Crypto on Desktop
These are the most common actions and they work cleanly on desktop.
To receive crypto:
Click on your Web3 Wallet and find the Receive option. Select the network you want to receive on — this is critical, always double-check the network matches what the sender is using. Copy your wallet address or show the QR code. Never send tokens on the wrong network to this wallet — cross-chain mistakes are usually not recoverable.
To send crypto:
Click Send in the Web3 Wallet interface. Enter the recipient address — paste it carefully and verify the first and last few characters match what you intend. Select the network and token. Enter the amount. Review the transaction details including the gas fee estimate. Confirm.
On desktop, the send flow shows you more information than the mobile version before you confirm — including network fee estimates in both the native token and USD equivalent. This additional visibility has saved me from accidentally sending during high-fee periods.
What Works Well and What Does Not
After a week of regular use, here is my honest assessment.
What works well:
The portfolio overview on desktop is genuinely excellent. Seeing all your assets across all chains in one clean interface, with proper labeling and current values, is something I previously needed multiple tools to achieve.
The swap aggregation is solid. I ran several comparisons between the built-in swap and going directly to DEXes, and the rates were competitive. The transparency about swap routes and price impact is better than I expected.
Customer support integration is a unique advantage of Binance Web3 Wallet over alternatives like MetaMask. If something goes wrong, you have an actual support channel to contact. With pure decentralized wallets, you are entirely on your own.
What does not work as well:
The WalletConnect requirement for DApp connections adds friction. Power users who want seamless desktop-native DApp browsing will find MetaMask more convenient for that specific use case.
The Binance account requirement is a real limitation for anyone prioritizing privacy or operating in jurisdictions where Binance has restrictions.
Some DApps do not explicitly list Binance Web3 Wallet as a connection option, which means you need to know to use WalletConnect. First-time users sometimes get stuck here.
Security — What You Need to Understand
The MPC key system that Binance uses is genuinely innovative and solves real problems with traditional seed phrase security. Most people who lose crypto do so because they lost or exposed their seed phrase. MPC makes that category of mistake harder to make.
But it introduces a different set of considerations. You are trusting Binance’s infrastructure for one third of your key. Binance is a large, well-established company — but it is a company, and companies can have problems. For small to medium amounts that you are actively using in DeFi, the convenience probably justifies the tradeoff. For large long-term holdings, a hardware wallet with full self-custody is still the gold standard.
The rules that never change regardless of which wallet you use:
Never share your wallet password with anyone. Never enter your recovery information on any site other than the official Binance platform. Always verify contract addresses on-chain before interacting with any new protocol. Be skeptical of any DApp that asks for unusual permissions.
Who Should Use Binance Web3 Wallet on Desktop
After spending a week with it, my honest recommendation is this:
If you are already a Binance user and want to participate in DeFi without managing a completely separate wallet setup, Binance Web3 Wallet on desktop is a genuinely good option. The interface is clean, the multi-chain support is comprehensive, and the portfolio view alone is worth it for active DeFi users.
If you are a privacy-focused user, a power user who needs seamless DApp connections, or someone managing very large amounts, MetaMask combined with a hardware wallet is still probably the better choice for your primary setup.
The two are not mutually exclusive. Many experienced crypto users maintain multiple wallets for different purposes. Binance Web3 Wallet on desktop has earned a place in that toolkit.
This article is for educational and informational purposes only. Nothing here constitutes financial or investment advice. Always research thoroughly before using any cryptocurrency wallet or application.
Check This also:- Is Crypto Dead After ETF? Here’s What Experts Think

and content creator with over 5 years of
hands-on experience in blockchain technology
and digital assets. He actively trades and
researches crypto markets daily, and shares
insights with over 110,000 followers on
Binance Square. He founded CrypBuzz.com to
provide honest, research-backed crypto
education for everyday investors.